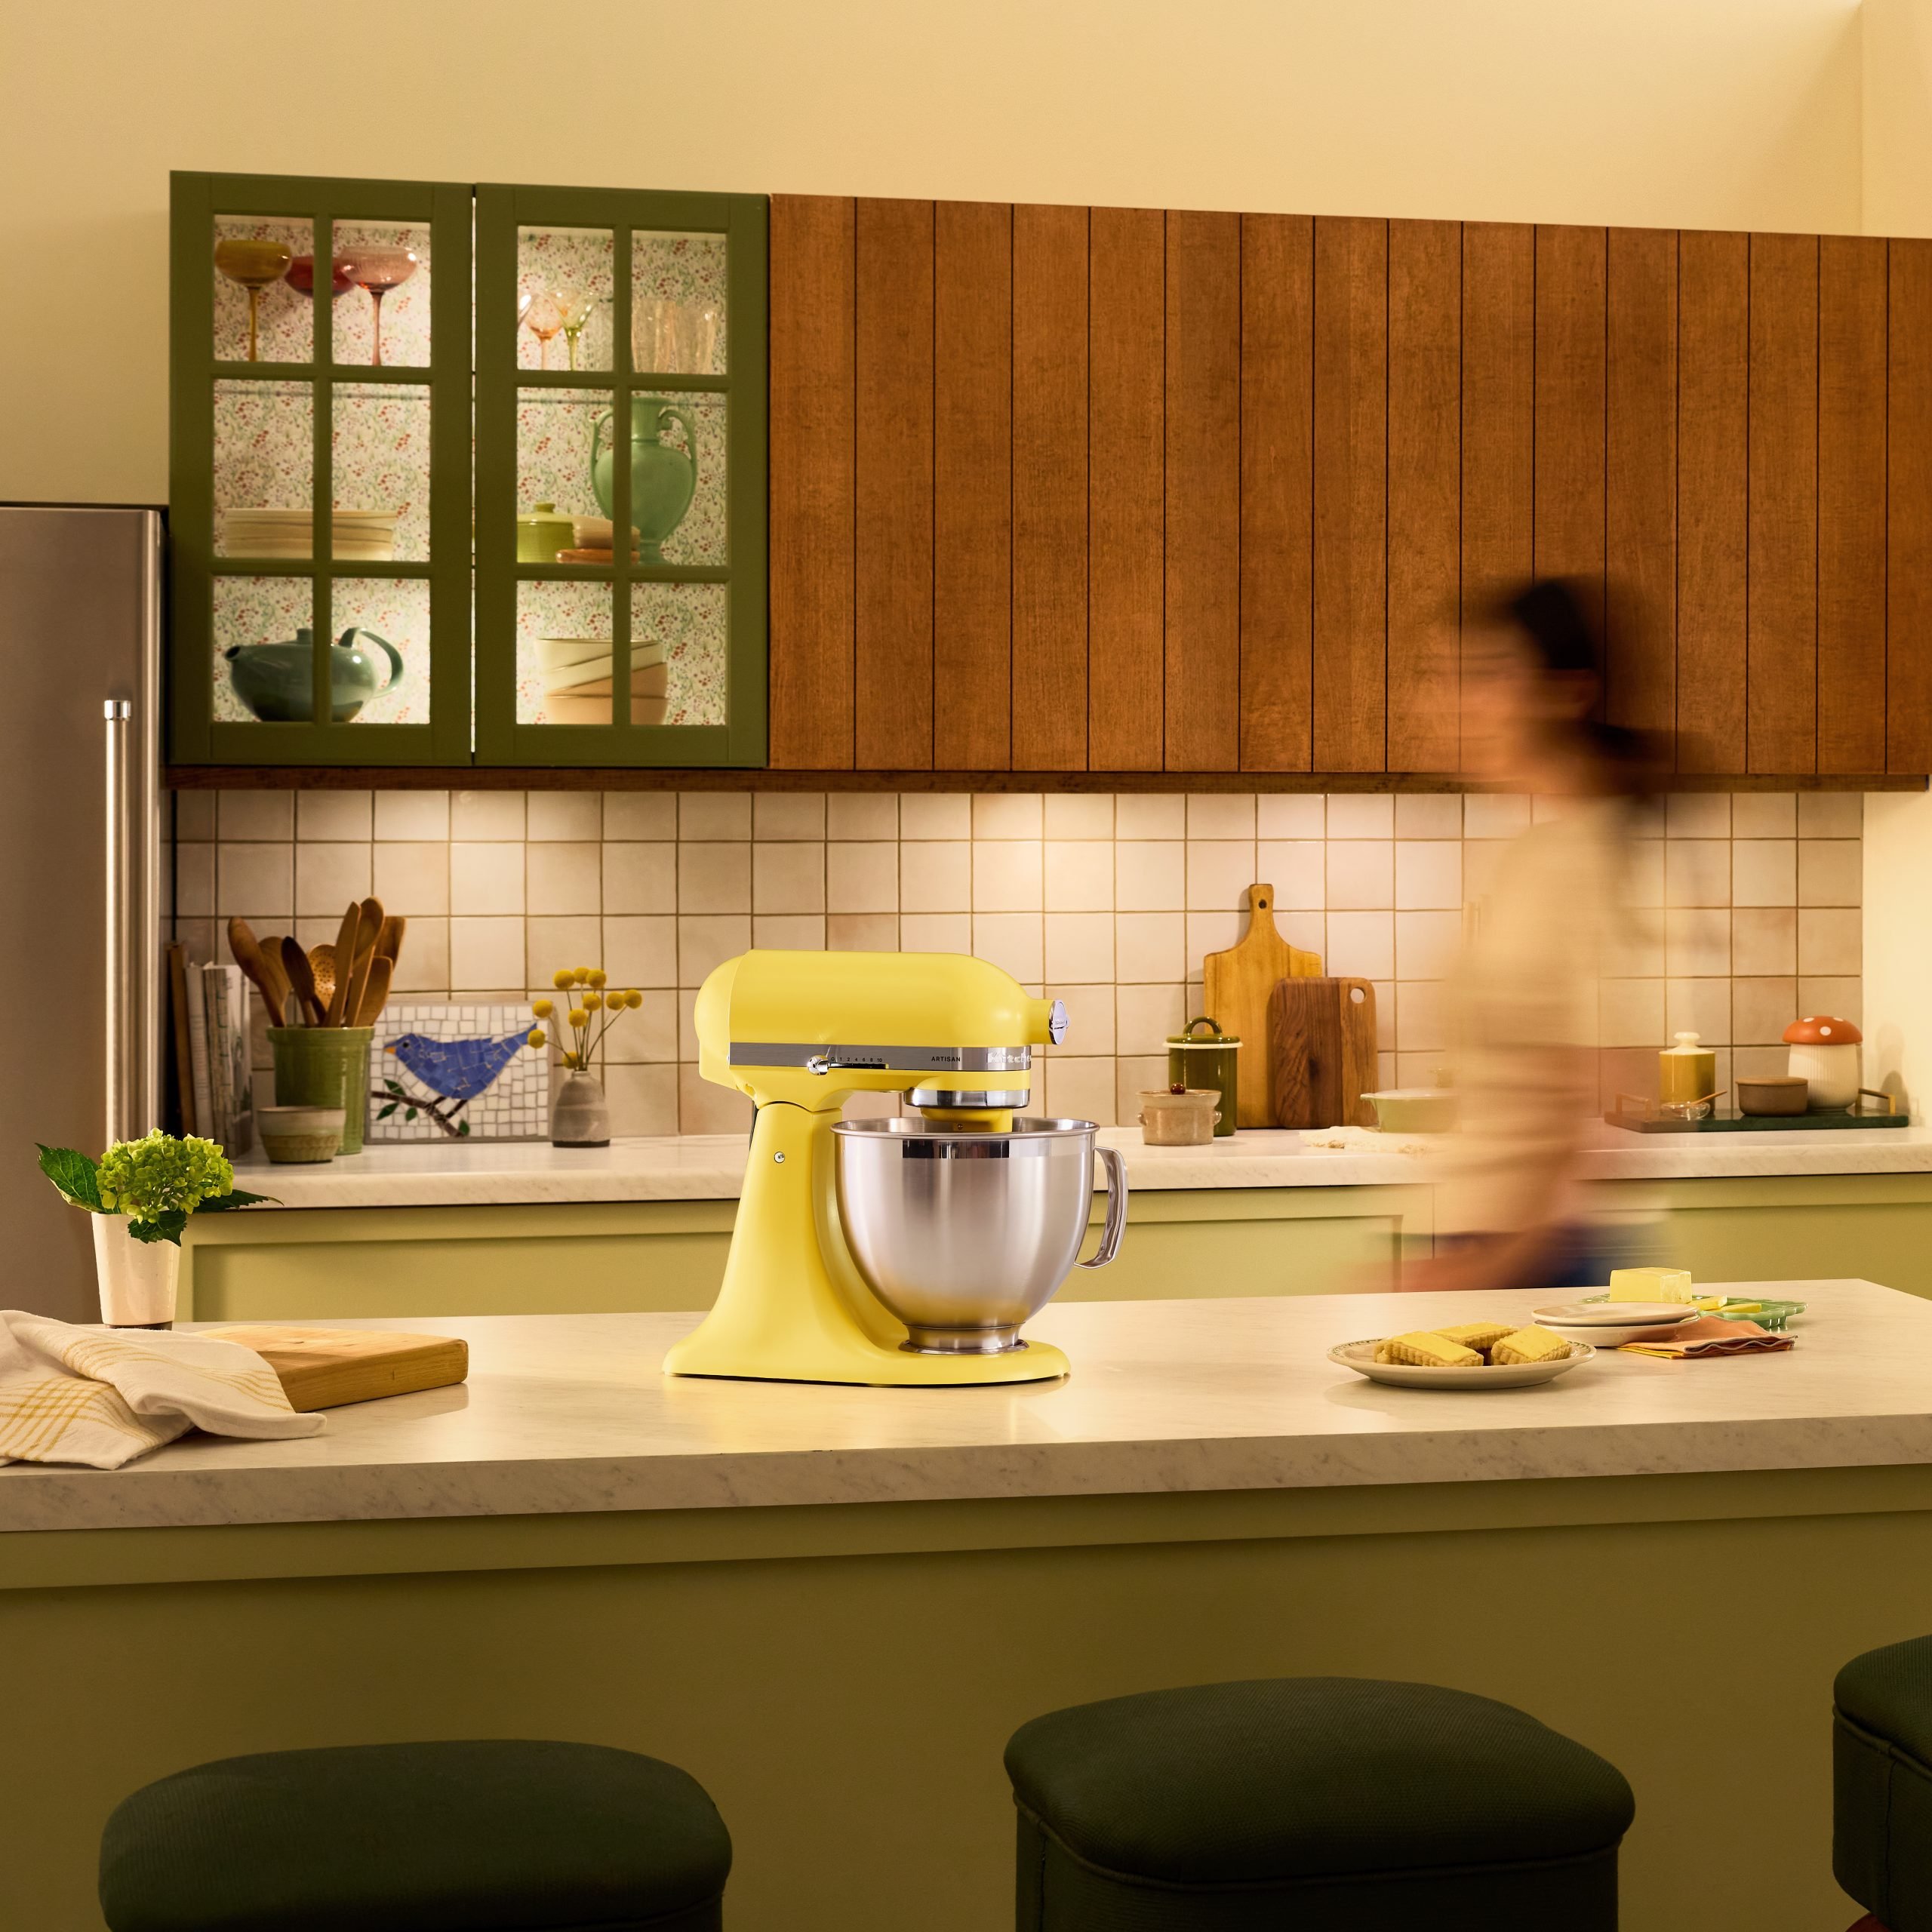
KitchenAid just announced ‘Butter’ as their Colour of the Year, and we’re completely in love with this stunning new hue. Butter is a soft, energizing yellow with a creamy, satin finish that spreads warm flavours and cherished memories to the table, creating a heartwarming atmosphere To celebrate, we couldn’t resist getting our hands on a mixer in this shade, and we’re already planning all the delicious recipes we can create. Ready to cook with colour?
Brioche
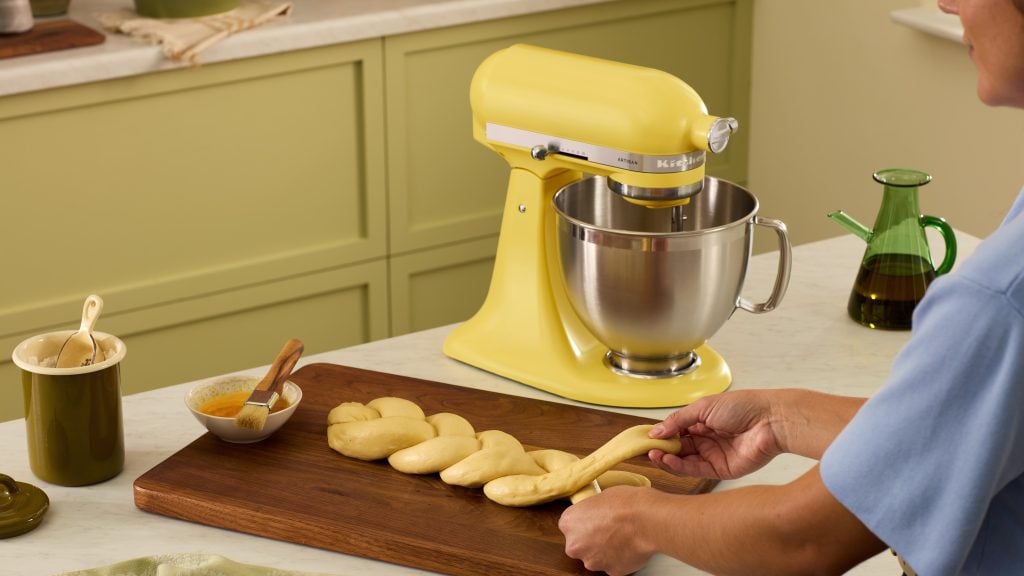
Equipment: KitchenAid® Stand Mixer, Dough Hook, Sifter/Scale Attachment, parchment paper, baking sheet
Prep Time: 45 minutes plus 12 hours proofing time
Bake Time: 30-35 minutes
Ingredients
3 ⅓ cups (400 g) bread flour
1 T (12 g) instant yeast
¼ cup (50 g) granulated sugar
½ tsp (2 g) salt
½ cup (120 mL) whole milk, room temperature
4 large eggs, room temperature, divided use
8 Tbsp (113 g) salted butter, room temperature
Steps
- Place bowl in Stand Mixer. Attach Sifter + Scale Attachment to Stand Mixer hub and power on the scale. Release the ingredient chute into the bowl.
- Measure 400 g of bread flour in the hopper of the Sifter + Scale and turn the mixer on speed 1 to sift flour into the bowl.
- Zero the scale, then add the 12 g instant yeast, 50 g granulated sugar, and 2 g of salt to the Sifter + Scale and allow to sift into the bowl as well.
- Detach attachment and attach Dough Hook Accessory.
- Turn the mixer to speed 1 and add milk and three eggs. Mix for 1 minute and stop to scrape sides if necessary to incorporate all dry ingredients.
- Turn mixer to speed 2 and knead for 9 minutes. Dough will be soft and sticky.
- At 9 minutes, continue kneading, adding softened butter 1 tablespoon at a time, allowing each tablespoon to incorporate before adding the next tablespoon.
- When all butter is added, continue kneading dough on speed 2 for an additional 8 minutes. Dough will be stretchy and sticky.
- Scrape dough into a greased bowl and cover with plastic wrap, allow to rise at room temperature for 1 hour.
- Gently punch down dough, shape into a ball, and re-cover bowl. Refrigerate for at least 8 hours to allow flavors to develop. Dough will be easier to handle for braiding when chilled.
- After chilling, remove from the refrigerator and punch down.
- On a clean lightly greased surface, divide dough into three equal portions. Lightly grease hands and roll and squeeze each portion into a 10-12-inch log. Pinch 3 ends together and braid, pinching other ends together and tucking under to form a neat loaf.
- Let proof at room temperature until doubled in size, 2-3 hours. Towards the end of proofing, preheat the oven to 400°F/200°C. Beat remaining egg and brush loaf with egg wash. Bake for 30-35 minutes or until the internal temperature is at least 190°F/88°C.
Pro Tip: Serve brioche with homemade butter. Leftover brioche makes excellent French Toast.
Homemade Butter
![]()
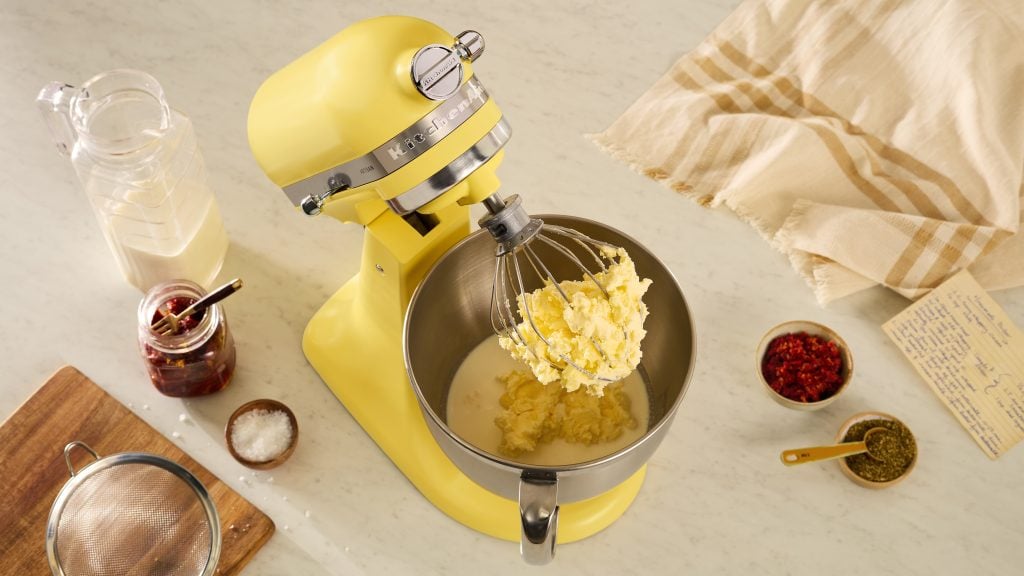
Special Equipment: KitchenAid® Stand Mixer, Whisk Accessory, Pouring Shield, kitchen towel or plastic wrap, wire mesh strainer, extra mixing bowl, KitchenAid Cordless Go Food Chopper
Prep Time: 40 minutes
Ingredients
2 cups heavy whipping cream, room temperature
½ tsp salt
Steps
- In the Stand Mixer bowl fitted with Whisk Accessory, add heavy whipping cream and salt. Secure Pouring Shield over bowl. Turn the mixer on to speed 1 and slowly increase to speed 10. Keep a towel or plastic wrap handy for splatters.
- As the cream whips, initially whipped cream will form. Then it will gradually break down into clumps of yellowish fat separated from the white buttermilk. This should take 10-15 minutes.
- When the butterfat has separated from the buttermilk, turn the mixer off and remove the pouring shield. Strain butter from buttermilk (save buttermilk for another baking purpose).
- Return butter to Stand Mixer bowl and rinse with cold water. Strain and rinse butter with fresh cold water until water is clear. This process helps remove buttermilk to keep the homemade butter fresh.
- Press butter into a glass container. Serve butter with fresh bread, pasta, or use in compound butter recipes. Store in the refrigerator for up to 1 week.
Cinnamon Maple Butter
½ cup (113 g) homemade butter, room temperature
1 tsp (3 g) ground cinnamon
1 Tbsp (21 g) maple syrup
- Attach Whip Accessory to Stand Mixer.
- In a clean bowl, add the homemade butter, cinnamon, and maple syrup.
- Whip butter on speed 4 until ingredients are fully incorporated and mixture is fluffy, for 1-2 minutes
- Serve immediately or form into a log on parchment paper and chill.
Garlic Herb Butter
½ cup (113 g) homemade butter, room temperature
1 clove (5 g) garlic
2 Tbsp (4 g) parsley leaves
1 Tbsp (4 g) chives
- Attach Whip Accessory to Stand Mixer.
- Using KitchenAid Go Cordless Chopper, chop garlic, parsley, and chives until finely minced.
- Add homemade butter and minced garlic and herbs to clean the Stand Mixer bowl and attach to the Stand Mixer.
- Whip on speed 4 for 1-2 minutes.
- Serve immediately or form into a log on parchment paper and chill.
Tomato Butter
½ cup (113 g) homemade butter, room temperature
2 Tbsp (14 g) sundried tomatoes in oil
1 tsp (3 g) dried oregano
- Attach Whip Accessory to Stand Mixer.
- Using KitchenAid Go Cordless Chopper, chop sun dried tomatoes and oregano until finely minced.
- Add homemade butter and minced tomato mixture to the clean Stand Mixer bowl and attach to the Stand Mixer.
- Whip on speed 4 for 1-2 minutes.
- Serve immediately or form into a log on parchment paper and chill.
Pro Tips: To avoid splatters when making the homemade butter, cover the chute of the Pouring Shield and any gaps between the shield and bowl with plastic wrap. Use the best heavy whipping cream you can find for the highest fat yield and creamiest butter.
Corn, Zucchini, and Mozzarella Quiche
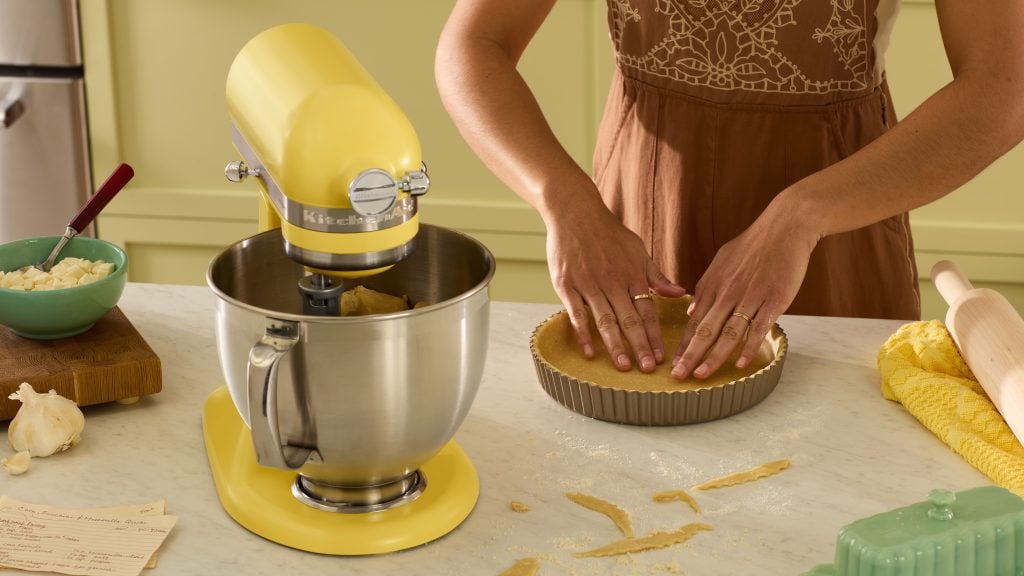
Special Equipment: KitchenAid® Stand Mixer, Pastry Beater, Flat Beater, 9-inch springform pan, baking sheet, 12-inch/30-cm frying pan
Prep Time: 30 minutes
Bake Time: 60 minutes
Ingredients
Shortcrust pastry
1 ½ cups (180 g) all purpose flour
½ tsp (2 g) salt
10 Tbsp (141 g) salted butter, cold, cut into 1/2 -inch cubes
2-4 Tbsp (30-60 mL) cold water
Quiche Filling
1 ½ cups (264 g) corn kernels (cut from 3-4 fresh corn cobs or from frozen)
1 medium zucchini (190 g), diced
4 large eggs
¼ cup (60 mL) milk
1 cup (20 g) basil leaves, chopped, plus extra leaves for garnish
1 clove (5 g) garlic, minced
½ cup (114 g) fresh mozzarella cheese, diced
½ tsp (1 g) salt
½ tsp (1 g) pepper
Steps
- Preheat oven to 350°F/175°C. To make crust, combine flour and salt in Stand Mixer bowl fitted with Pastry Beater Attachment.
- Turn to speed 1 to combine, then add butter cubes and continue on stir speed until mixture is crumbly, 1-2 minutes.
- With mixer continuing to run, slowly add 2 Tbsp of cold water, adding additional 1-2 tablespoons if needed to just combine dough into crumbly mass. Turn off mixer. Press dough into lightly greased springform pan. Prick pastry shell all over with a fork, then bake for 20 minutes. While baking, prepare filling.
- Heat 12-inch frying pan over medium-high heat. Add corn kernels and zucchini and allow to cook without stirring for 8-10 minutes or until browned. Turn off heat.
- In clean Stand Mixer bowl, combine 4 eggs and milk then mix with Flat Beater Accessory on speed 1 for 1-2 minutes. While continuing to stir, add garlic, basil, cheese, salt, and pepper until combined. Turn off mixer.
- When crust has finished initial bake, remove from oven and add corn and zucchini. Top with egg mixture and return to oven to bake for 40-45 minutes, or until center is firm.
- Garnish with fresh basil leaves before serving.
Pro Tip: Quiche can also be baked in a 10-inch tart pan. Using the same crust and egg/milk ratios you can experiment with other vegetable, cheese, and cooked meat combinations!
Yuzu-Glazed Shortbread
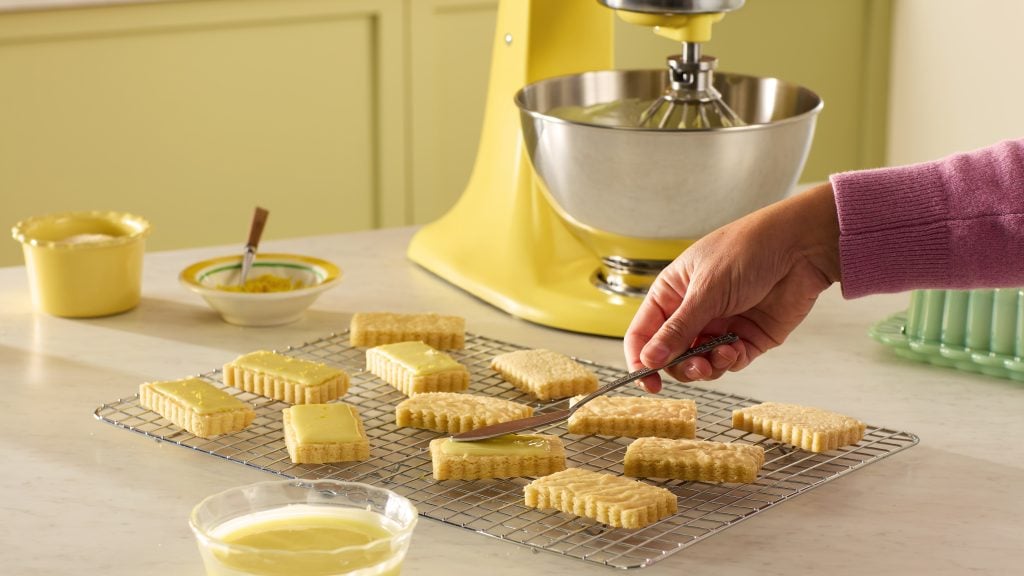
Special Equipment: KitchenAid® Stand Mixer, Flat Beater, parchment paper, baking sheets
Prep Time: 20 minutes
Bake Time: 30-35 minutes
Ingredients
Shortbread
½ cup (100 g) granulated sugar
1 Tbsp (6 g) lemon zest, plus additional zest for garnish if desired
1 cup (227 g) salted butter, room temperature
1 egg yolk from 1 large egg
2 tsp (10 g) yuzu juice
2 ½ cups (300 g) all purpose flour
½ cup (60 g) powdered sugar
2 Tbsp (16 g) cornstarch
¼ (1 g) tsp salt
Glaze
1 cup (120 g) powdered sugar
1-2 Tbsp (15-30 g) yuzu juice
Steps
- Preheat the oven to 300Fº/150°C.
- Add sugar and lemon zest to the Stand Mixer bowl fitted with Flat Beater Accessory. Turn to speed 2 to infuse sugar with lemon oils for 1 minute.
- Add butter to sugar and cream together on speed 4 for 2-3 minutes. Turn down to speed 2 and add egg yolk and yuzu juice and mix for an additional 30 seconds.
- Turn mixer speed 1 and add flour, powdered sugar, cornstarch and salt. Mix until just combined, about 1 minute.
- Scrape dough onto a parchment-lined baking sheet and pat into rectangular shape ½-inch/1 cm thick. Bake for 30-35 minutes or until the edges are lightly golden brown.
- Let cool for 5 minutes then use a bench scraper to cut into rectangles.
- To make glaze, in a clean Stand Mixer bowl fitted with Whisk Accessory, add powdered sugar and 1 Tbsp yuzu juice. Turn to speed 1 and mix until smooth. Scrape sides of bowl if needed and add additional yuzu juice 1 tsp at a time if thinner texture is desired.
- Drizzle glaze over cooled shortbread cookies, sprinkle with lemon zest to garnish.
Pro Tip: You can easily substitute an equal amount of lemon juice for the yuzu juice in the cookies and the glaze if desired.
Interested in seeing more recipes? Click Here!